UDFs for Recruiting
UDFs are used throughout Quadrant Recruiting functionality to build an applicant's profile and determine their suitability for the postings they apply for. Once a UDF for recruiting has been created, it must be referenced in the System Configuration window for it to be available for use in Quadrant Self Service.
Several types of UDFs are required to get the most out of Quadrant Self Service's Recruiting functionality:
- Posting Applicant – Global type UDFs are automatically attached to every job posting created. They are typically used to track an applicant's progress as they move through the application process. For example, they can record information like interview or reference check results.
- Posting Applicant – By Posting type UDFs can be selectively attached to individual job postings to gather additional information about an applicant's suitability. When creating a job posting in Quadrant Self Service, Posting Applicant – By Posting UDFs become available for selection in the Applicant UDF list box on the Job Posting Details page.
- Employee type UDFs are used to create the questionnaires that employees or applicants fill out when they first create their profile in Quadrant Self Service, to record Skill and Competency information, and to collect demographic information such as an employee or applicant's address and phone numbers. For an Employee type UDF to become visible in Quadrant Self Service, it must be selected on the System Configuration window in Quadrant during configuration.
- Org Detail type UDFs are used when creating on Org Level for job descriptions.
Note! A Questionnaire type UDF containing confidential applicant information that is attached to a job posting will be accessible to all Managers in Quadrant Self Service, even if their Security Profile would prevent them from viewing the same questionnaire in Quadrant. UDFs that could contain sensitive personal information should only be attached to an employee's record in Quadrant where access can be regulated, and not to a job posting.
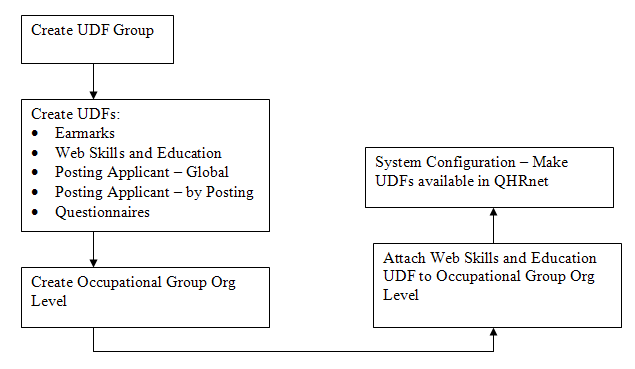
Refer to this flow chart when configuring your UDFs for Recruiting to help you through the process.
When setting up UDFs for recruiting, it’s a good idea to create a group just for the UDFs you create for recruiting purposes.
To create a UDF group for recruiting
- Open the Configuration menu, and then the User Defined Folders window.
- Click the Group Lookups
 button at the upper left side of the window.
The Lookups dialog opens. It's a good idea to create a separate group for storing your recruiting UDFs. - Click Add.
- Give the group a readily identifiable name, for example Applicant Tracking or Recruiting in the Description box.
- Type a Short Description and Abbreviation for the group in the appropriate boxes.
- Click Save, and then Close.
After you've created a Recruiting UDF group, you can begin to configure the UDFs used to ask the questions that will help to determine an applicant's suitability for a job posting. The following example describes how to configure an Employee type Questionnaire UDF, since that's the most common type of UDF created for Recruiting.
To configure UDFs for recruiting
- Select a UDF type from the User Defined Folder Type list box at the bottom of the User Defined Folders window.
The Employee type is typically used for questionnaires. Posting Applicant - Global UDFs are automatically attached to all job postings and are generally used to keep track of where an applicant is in the application process. Posting Applicant - By Posting UDFs are used to collect more information to determine an applicant's suitability and are attached to individual job postings. - Click Add.
- Select the Recruiting UDF group from the Group list box.
- Enter a name for the UDF, for example Employment Questionnaire 1, in the Description box.
- Leave the Notification Type box clear.
- Leave the Start Date Desc and End Date Desc boxes at the default settings.
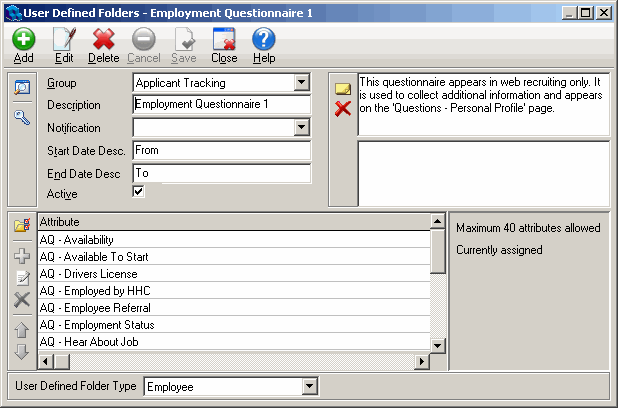
- Type a description for the UDF in the Comment field at the upper right corner of the User Defined Folders window (optional).
- Click the Add button beside the Attribute pane at the bottom of the window.
The UDF Attributes dialog opens. This is where you add the questions or prompts to the questionnaire. - Select the attributes that you want to appear on the questionnaire in the Available pane and use the arrows to move them to the Selected pane.

- Click OK.
- Click Save.
If the available attributes don’t quite suit your needs, you can create new ones or edit attributes to make them more usable. If you edit an attribute, it changes in every other UDF that uses it.
To create UDF attributes
- Click the Modify Attributes
 button at the left side of the Attribute pane to add additional attributes or edit existing attributes.
The User Defined Folder Attributes dialog opens. You can look at individual attributes to see if the details that will appear on the questionnaire meet your needs. - Click Add.
An empty row appears at the bottom of the Attribute pane and the Attribute Details pane becomes active. - Type a readily identifiable name (30 character maximum) for the attribute in the Name box in the Attribute Details pane.
- Select a data type.
The available Attribute Details change depending on what data type you select.Numeric Data Type
The numeric data type is used to record a numeric amount that you want to track for an HR activity, for example, test scores or evaluation ratings.
Character Data Type
The character data type is used to record text. For example, you can create a character data type attribute called Course. The attribute could then be added to a UDF that is used to track training.
Date Data Type
The Date Data Type can be created to keep track of when, for example, an employee received an award or a certification.
Lookup Data Type
A Lookup Data Type attribute gives you several different options to choose from when selecting a value. For example, you could set up an attribute for course results that allows you to choose one of several possible outcomes—pass, fail, or incomplete to add to an employee’s record.
Memo Data Type
The Memo Data type is used to record a large volume of text. The field allows 8000 characters.
- Enter values for the remaining attribute details, and then click Save.